Colorbond roof sheet installation offers durability and weather resistance, making it a popular choice for modern roofing. This guide provides a structured approach to installing Colorbond roof sheets, ensuring proper techniques and safety measures for a long-lasting, efficient roofing solution.
1.1 Overview of Colorbond Roofing
Colorbond roofing is a durable, pre-painted steel material designed for exterior use, offering excellent weather resistance and strength. It is widely used in Australia for its ability to withstand harsh conditions, including heavy rain, intense sunlight, and strong winds. Colorbond roofing is termite-proof, low-maintenance, and available in various colors, making it a versatile and cost-effective choice for modern homes.
1.2 Importance of Proper Installation
Proper installation of Colorbond roof sheets is essential to ensure durability, prevent leaks, and maintain structural integrity. Improper techniques can lead to premature wear, reduced weather resistance, and safety hazards. Correct alignment, secure fastening, and adherence to manufacturer guidelines are critical for optimal performance and long-term protection against harsh weather conditions, ensuring the roof remains safe and functional for years to come.

Preparing the Roof Area
Preparing the roof area involves measuring, assessing the structure, removing old materials, and ensuring a clean, stable surface for the new Colorbond sheets to be installed properly.
2.1 Measuring and Assessing the Roof Structure
Accurately measure the roof dimensions and assess its condition to ensure compatibility with Colorbond sheets. Check for structural integrity, damage, or uneven surfaces. This step ensures proper fitment and material requirements, preventing installation issues later.
2.2 Removing Old Roofing Materials
Before installing Colorbond roof sheets, remove all existing roofing materials carefully to avoid damage to the structure. This includes old corrugated iron, tiles, or other coverings. Ensure the roof frame is clean and secure, addressing any rot or damage. Safety is crucial; use proper tools and protective gear when handling heavy materials to prevent injuries and ensure a smooth installation process.

Installing Sarking or Roof Blankets
Install reflective foil laminate or foil-backed roof blankets for insulation and to prevent rust. This layer ensures a smooth surface for Colorbond sheets and enhances durability.
3.1 Purpose of Sarking in Roof Installation
Sarking, a reflective foil laminate, serves as a protective layer under Colorbond roof sheets. It prevents moisture damage, reduces noise from rain, and provides thermal insulation. This layer also acts as a barrier against dust and pests, ensuring a cleaner installation environment. Properly laid sarking enhances the overall durability and performance of the roofing system, making it a crucial step in the installation process.
3.2 Laying Sarking Correctly
Start by ensuring the sarking is tightly fitted across the roof area, beginning from the bottom edge. Overlap each sheet by 150-200mm to prevent gaps. Secure the sarking with battens and staples, ensuring a smooth surface for the Colorbond sheets. Cover the entire roof structure, including valleys and ridges, to provide a uniform base. Properly laid sarking ensures optimal performance and protection for the roofing system.
Laying Colorbond Roof Sheets
Begin at the bottom edge, positioning sheets to overlap correctly and prevent leaks. Align sheets with the roof structure, ensuring even spacing and proper securement with screws.
4.1 Positioning the First Roof Sheet
Start by placing the first Colorbond roof sheet at the bottom edge, ensuring it aligns with the roof structure. Secure it temporarily with screws, checking it is square and evenly spaced. Proper alignment prevents future issues like leaks or uneven wear. Begin on the side opposite the prevailing wind to simplify positioning and minimize potential damage from weather conditions.
4.2 Overlapping and Aligning Sheets
Proper overlap and alignment are critical for a watertight and visually appealing roof. Each Colorbond sheet should overlap the previous one by one and a half corrugations to prevent leaks. Align sheets carefully to maintain a smooth surface. Use hex head screws to secure them, starting from the bottom edge and working upwards to ensure water runs off efficiently.
Securing the Roof Sheets
Securing Colorbond roof sheets involves using high-quality screws and ensuring they are tightly fixed to prevent movement and leaks. Proper fastening ensures weatherproofing and structural integrity.
5.1 Using Screws for Fastening
Using screws for fastening Colorbond roof sheets is essential for a secure and durable installation. High-quality, corrosion-resistant screws should be used to prevent rust and ensure long-term stability. Screws must be spaced evenly, typically 300-400mm apart, and driven straight to avoid damaging the sheets. Over-tightening should be avoided to prevent distortion. Proper screw placement ensures a weatherproof seal and maintains the structural integrity of the roof.
5.2 Ensuring Tight and Even Fixation
Ensuring tight and even fixation is critical for a secure Colorbond roof installation. Use a drill with a torque setting to avoid over-tightening, which can damage the sheets. Screws should be tightened progressively across the roof to maintain even pressure. Regularly check each screw’s torque to ensure consistency and prevent unevenness that could lead to leaks or structural issues. Properly spaced and aligned screws are vital for long-term durability and weather resistance.

Installing Ridge Caps and Flashings
Ridge caps and flashings are installed to ensure weatherproofing and prevent water ingress. Proper fitting and sealing are crucial to maintain the roof’s integrity and avoid leaks.
6.1 Fitting Ridge Caps for Weatherproofing
Fitting ridge caps is essential for weatherproofing, as they seal the roof’s highest points. Ensure caps are tightly secured to prevent water ingress and wind damage. Proper alignment and sealing are critical to maintain the roof’s structural integrity and protect against leaks. Use compatible materials and follow manufacturer guidelines for a secure and durable installation.
6.2 Sealing Vents and Chimneys
Sealing vents and chimneys is crucial for ensuring a watertight roof. Use high-quality flashing materials to cover gaps around vents and chimneys, preventing water ingress. Properly align and secure flashings to match the roof’s pitch and design. Regularly inspect and maintain these seals to ensure long-term weatherproofing and prevent potential leaks or structural damage.
Safety Precautions
Safety measures are essential during Colorbond roof installation. Ensure proper handling of heavy sheets, use protective gear, and maintain a stable working environment to avoid accidents.
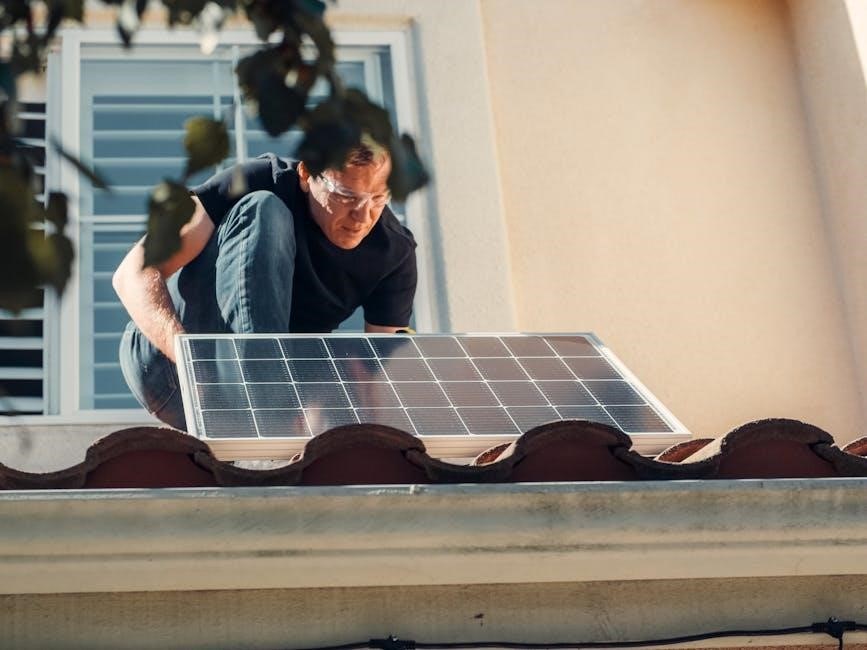
7.1 Handling Heavy Roof Sheets Safely
Handling Colorbond roof sheets requires careful planning to avoid injuries. Always use proper lifting equipment and techniques to manage the weight. Ensure a firm grip and balance when carrying sheets. Avoid bending or twisting, and consider team lifting for larger or heavier panels. Secure sheets during transportation and installation to prevent accidental drops. Proper footwear and a clear work area are essential for safe handling.
7.2 Avoiding Injuries During Installation
Avoiding injuries during Colorbond roof installation requires strict adherence to safety measures. Always wear appropriate safety gear, including helmets, gloves, and harnesses, to minimize risks. Ensure proper footing and balance on ladders or roofs. Use tools designed for the task to prevent accidents. Keep the work area clear of debris and obstacles. Regularly inspect equipment for damage. Follow manufacturer guidelines and consider professional assistance for complex tasks to ensure a safe installation process.

Tools and Equipment Needed
Essential tools for Colorbond roof installation include drills, hex head screws, measuring tapes, safety harnesses, and ladders. Proper equipment ensures safe and efficient installation.
8.1 Essential Tools for Colorbond Installation
Drills, hex head screws, and measuring tapes are crucial for accurate fastening and alignment. Safety harnesses and ladders ensure secure access, while utility knives aid in cutting sheets.
8.2 Recommended Safety Gear
Safety harnesses, gloves, and safety glasses are essential to prevent injuries. Steel-capped boots protect feet from heavy tools and materials. A dust mask is recommended when cutting sheets to avoid inhaling particles. Ensure all safety gear meets industry standards to guarantee protection during the installation process and minimize risks of accidents.
Cost Considerations
Cost considerations involve materials, labor, and regional pricing. Project size and complexity also affect expenses. Comparing quotes ensures the best value for your investment.
9.1 Factors Affecting Installation Cost
The cost of Colorbond roof installation is influenced by roof size, material quantity, labor rates, and regional pricing. Complexity, such as multiple valleys or steep slopes, may increase expenses. Additional features like insulation, gutters, and flashings also contribute to the total cost, making it essential to obtain detailed quotes for accurate budgeting.
9.2 Material and Labor Expenses
Material costs for Colorbond roof sheets range from $18 to $24 per sheet, while installation labor expenses vary based on location and installer rates. Factors like roof complexity, additional features, and regional demand influence labor costs. Overall, the total expense combines material prices, labor fees, and any extra components, ensuring a comprehensive budget for the project.

Maintenance and Care
Regular inspections and cleaning are essential for maintaining Colorbond roof sheets. Repairing damages promptly and preventing corrosion ensures long-term performance and durability.
10.1 Regular Inspection of Roof Sheets
Regular inspection of Colorbond roof sheets is essential to identify potential issues early. Check for scratches, rust, or loose screws, and ensure all fasteners are secure. Inspect for debris accumulation, which can cause water pooling and damage. Look for signs of wildlife interference or weather-related wear. Addressing these issues promptly helps maintain the roof’s integrity and appearance, ensuring long-term durability and performance.
10.2 Cleaning and Repairing Damages
Cleaning Colorbond roof sheets involves gently removing dirt and debris with a soft brush or mild detergent to prevent scratching. For repairs, promptly address scratches by sealing them to prevent rust. Dented or loose sheets should be fixed to ensure structural integrity. Regular cleaning and timely repairs maintain the roof’s appearance and functionality, extending its lifespan and protecting against further damage or corrosion over time.
DIY vs. Professional Installation
Deciding between DIY and professional Colorbond roof installation is crucial. While DIY may save costs, it involves complexity and safety risks. Professional installation ensures expertise, reliability, and adherence to safety standards, especially for complex roofing structures, guaranteeing a durable and secure result.
11.1 Pros and Cons of DIY Installation
DIY Colorbond roof installation can save costs but requires precise skills and safety precautions. While it offers flexibility and satisfaction, handling heavy sheets and ensuring correct alignment is challenging. DIY is feasible for simple roofs but risky for complex structures, potentially leading to leaks or damage. Proper tools and experience are essential for a successful DIY project.
11.2 When to Hire a Professional
Hiring a professional is recommended for complex roof structures or large-scale projects. Professionals ensure precise alignment, proper sealing, and adherence to safety standards. They handle heavy sheets safely and provide warranties for their work. DIY installation may lead to mistakes, while professionals guarantee a flawless finish and long-term durability, making their expertise invaluable for ensuring a weather-tight and secure roof.
Colorbond roof sheet installation ensures durability, weather resistance, and aesthetic appeal. Proper techniques and safety measures guarantee long-term performance. Follow this guide or consult professionals for optimal results.
12.1 Final Tips for a Successful Installation
Ensure proper preparation and alignment of sheets for a seamless fit. Secure sheets tightly with screws, maintaining even spacing. Double-check overlaps to prevent leaks. Use compatible materials to avoid corrosion. Handle heavy sheets safely to prevent injuries. Regular inspections and maintenance will extend the roof’s lifespan. For complex projects, consider consulting a professional to ensure a flawless installation.
12.2 Long-Term Benefits of Colorbond Roofing
Colorbond roofing offers exceptional durability, resisting weather, wind, and fire. Its pre-painted finish retains color vibrancy, reducing fading. Low maintenance and termite resistance enhance longevity. Energy-efficient properties help reduce heating and cooling costs. Made from recyclable steel, it’s eco-friendly. A Colorbond roof boosts property value and provides long-term protection, ensuring a secure and sustainable roofing solution for years to come.